Reviewed and Updated: July 2, 2026
A home can feel impossible to clean when kitchen counters are covered, closets are packed, laundry piles take over the floor, and every room has a “deal with it later” stack. The answer is not to keep cleaning around the clutter. Start by clearing enough space to access the areas where dust, crumbs, hair, and daily mess collect. Once floors, counters, cabinets, and shelves are easier to reach, your regular cleaning routine becomes faster and far less frustrating. From a professional cleaning perspective, clutter often blocks the places that need attention most: bathroom vanities, kitchen counters, floor edges, closets, entryways, and high-traffic living areas. These decluttering tips are practical for busy New Jersey homeowners, renters, apartment residents, and families who want a cleaner, more manageable home without trying to clear an entire house in one weekend.
Quick Answer: What Are the Best Decluttering Tips From Professionals?
The best decluttering tips from professionals are to begin with one small low-emotion space, make quick keep-or-remove decisions, use real storage limits, remove unwanted items from the home quickly, and build a short weekly reset routine. Decluttering works best when you reduce the number of items you own before buying bins, baskets, drawer dividers, or other storage products.
Use these professional decluttering tips as your starting checklist:
- Start with one drawer, shelf, cabinet, or small counter.
- Use a 10- or 15-minute decluttering session.
- Sort items into keep, donate, recycle, return, sell, or dispose.
- Avoid creating a large “maybe” pile.
- Declutter before buying storage containers.
- Keep daily-use surfaces mostly clear.
- Set limits for closets, drawers, cabinets, and shelves.
- Keep a donation bag or bin ready.
- Remove donation items before they become a new pile.
- Use the one-in, one-out rule for fast-growing categories.
- Reset one clutter hotspot every week.
Understand the Difference Between Decluttering, Tidying, and Organizing
Many people feel stuck because they treat tidying, organizing, and decluttering as the same task. They are related, but each solves a different problem. Tidying makes a room look better for the moment. Organizing creates a system for items you have decided to keep. Decluttering comes first because it reduces the amount of stuff you need to clean around, store, sort, and maintain.
| Task | What It Means | What It Does Not Solve |
| Tidying | Putting items back in their usual place | Too many items in the home |
| Organizing | Creating systems for items you are keeping | Overfilled drawers, closets, and cabinets |
| Decluttering | Removing items you no longer use, need, want, or have room for | Deep cleaning itself |
Declutter Before Buying Storage Solutions
Storage bins, baskets, drawer dividers, and shelving can be helpful, but they cannot fix an overcrowded home on their own. If you buy containers before reducing clutter, you may end up with organized clutter that still fills cabinets, closets, and corners. First decide what deserves space in your home. After that, choose storage that fits the items you truly use and value.
A simple rule is to let the storage area set the limit. A kitchen drawer, hallway closet, bathroom cabinet, or pantry shelf can hold only so much. If the space is packed, you may need to remove duplicates, expired products, broken items, or things that no longer match your current routine.
Clear Access Makes Cleaning Easier
Decluttering creates access. Clear counters are easier to wipe. Open floors are easier to vacuum and mop. Empty bathroom shelves make it easier to clean mirrors, sinks, and vanities. A closet with visible floor space is easier to dust and maintain. This is why decluttering before a deep clean can save time and help cleaners reach more of the home. RMS Cleaning‘s deep-cleaning guidance recommends removing unnecessary clutter before cleaning to make surfaces and floors easier to access.
Step 1: Choose One Small Area That Causes a Daily Problem
Do not begin by emptying every closet or pulling everything out of a room. That approach often creates the “dump trap,” where a small project turns into a much larger mess. Instead, choose one area that causes a daily problem. It could be a crowded kitchen counter, a bathroom vanity, an overflowing entryway, a laundry chair, a messy desk, a junk drawer, or a single pantry shelf. The best starting point is usually visible and manageable. Completing one small space gives you a quick result and helps you build confidence for the next project.
Start With Low-Emotion Areas
Begin with spaces where decisions are simple. A medicine cabinet, junk drawer, bathroom sink storage, linen closet, entryway basket, or kitchen utensil drawer is usually easier than a box of family photos or childhood keepsakes. Look for expired toiletries, duplicate mugs, broken pens, old receipts, empty containers, worn-out towels, or items you no longer use. Low-emotion areas help you practice making decisions without guilt. You are more likely to keep moving when the first task does not involve difficult memories, expensive purchases, or family pressure.
Use a 10- or 15-Minute Decluttering Session
A timer turns decluttering into a short home-maintenance task instead of an all-day project. Set a timer for 10 or 15 minutes, focus on one defined space, and stop when the timer ends. You may choose to continue, but you do not need to finish the whole room to make progress. Short sessions work especially well for busy New Jersey households where work, school, commuting, family schedules, and daily responsibilities leave little time for a full-home reset. A completed drawer, shelf, or countertop is better than an unfinished house-wide project.
Step 2: Make Quick Decisions With the Keep, Donate, and Toss Method
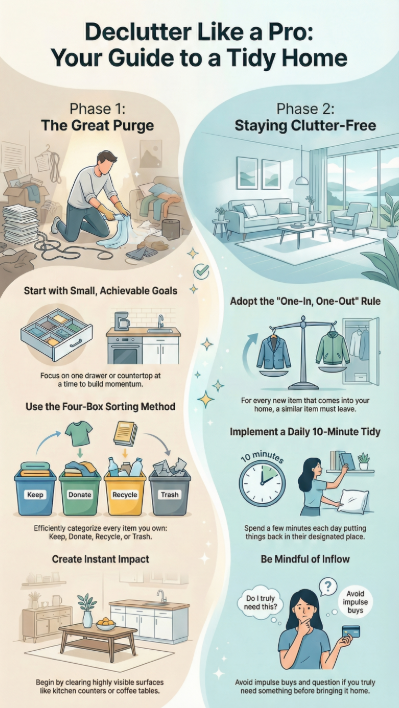
The three-pile method is simple because every item gets an immediate decision. Create separate bags, boxes, or bins for items you will keep, donate, and toss. This keeps you from moving the same object from one room to another without actually deciding what to do with it. You can add a few extra categories for items that need special handling, such as valuable items you plan to sell, borrowed belongings you need to return, or electronics and batteries that should be recycled.
| Category | What It Means | Examples |
| Keep | You use it, need it, or truly value it | Everyday cookware, current clothes, work supplies |
| Donate | It is usable but no longer needed | Extra linens, good-condition clothing, duplicate dishes |
| Toss | It is broken, expired, damaged, or unusable | Empty bottles, broken containers, worn-out items |
| Sell | It has enough value to list quickly | Furniture, specialty tools, newer electronics |
| Recycle | It should not go into regular trash | Paper, batteries, electronics, approved materials |
| Return | It belongs to someone else | Borrowed books, school materials, family items |
Avoid the “Maybe” Pile
A large “maybe” pile often becomes a delayed-decision pile. It takes up space, creates visual clutter, and makes the next decluttering session harder. If you genuinely need time to think, use one small review box instead of an open pile. Label it with a date and revisit it within 30 days. Ask yourself simple questions: Have I used this in the last year? Would I buy it again today? Do I own something that does the same job? Does it fit my current life, or am I keeping it for an old version of my routine?
Use Physical Limits to Make Decisions Easier
The 50% rule can be useful when a category is clearly overfilled. For example, if you have too many mugs, towels, throw pillows, plastic containers, or decorative items, try reducing that category by about half. You do not need to follow the number exactly, but the rule encourages honest editing instead of keeping everything. Use the container concept as well. A closet, drawer, cabinet, shelf, or bin has a natural boundary. If items do not fit comfortably in their assigned space, something may need to leave. The goal is not to create an empty home. The goal is to keep an amount that your home can realistically hold.
Step 3: Declutter the Areas That Make Cleaning Hardest
Some clutter is more disruptive than others because it blocks the areas you clean most often. Start with the places where clutter affects food preparation, bathroom hygiene, walking space, laundry, and shared household routines. These are the spaces where a few simple changes can make the home feel noticeably easier to manage.
Clear Kitchen Counters, Cabinets, and Pantry Shelves
Kitchen clutter can make daily cleaning harder because counters become crowded with mail, small appliances, food containers, water bottles, dishes, and items that belong in other rooms. Keep only regularly used appliances on the counter. Everything else should have a cabinet, pantry, or storage home.
Check pantry shelves for expired food, duplicate spices, unused mugs, old takeout containers, damaged cookware, and extra utensils. Clear refrigerator shelves and kitchen drawers as well. The less you store on counters, the easier it is to wipe spills, clean the backsplash, and maintain a usable food-prep space.
Reduce Bathroom Cabinet and Linen Closet Overflow
Bathrooms often collect empty bottles, expired cosmetics, duplicate toiletries, old medication containers, damaged towels, and product samples that nobody uses. Clear the bathroom vanity first, then work through cabinet shelves, drawers, and linen storage. Keep daily-use items easy to reach and remove products that are expired, empty, or no longer useful. For medications, batteries, household chemicals, electronics, paint, and other special items, check New Jersey’s local disposal guidance rather than placing them in the ordinary trash.
Reset Entryways, Living Areas, and Shared Surfaces
Entryways and living rooms often become drop zones for shoes, coats, bags, packages, mail, toys, throw blankets, chargers, and random household belongings. These items create visual clutter quickly because they are used by multiple people throughout the day. If you aren’t sure where to begin, following a living room cleaning checklist can help you identify which items are essential and which are just collecting dust.
Give common items a simple home near where they are used. A shoe tray, coat hook, mail basket, toy bin, charging station, or return basket can prevent items from spreading across tables, couches, and floors. Clear one high-visibility surface, such as the coffee table, dining table, console table, or kitchen island, and protect it from becoming a storage area.
Simplify Bedrooms, Closets, and Laundry Areas
Bedrooms become cluttered when clothing, shoes, bedding, shopping bags, and laundry have no clear place to go. A chair can quickly become a pile for “not clean but not dirty” clothes, while the closet becomes too full to use properly. Start by clearing the floor and chair. Then reduce clothes that no longer fit, shoes that are not worn, worn-out hangers, duplicate bedding, and old laundry products. Keep a hamper where laundry actually collects, and create one small place for clothes that can be worn again before washing.
Sort Paper and Home Office Clutter Separately
Paper clutter needs a different system because it may include bills, school forms, receipts, mail, tax documents, work papers, and items that require action. Do not mix important paperwork with junk mail or random household notes.
Use five clear categories:
- Act: Bills, forms, appointments, or items that need attention.
- File: Important records you need to keep.
- Shred: Sensitive documents you no longer need.
- Recycle: Junk mail, old flyers, and unnecessary paper.
- Review later: A small, date-limited folder for items you need to revisit.
Step 4: Handle Sentimental and “Just in Case” Items Last
Sentimental clutter is different from ordinary household clutter because memories, guilt, family expectations, and financial value may be involved. Do not start your decluttering project with family photos, inherited furniture, childhood keepsakes, or memory boxes. Build momentum in easier spaces first. Once you have cleared everyday clutter, you will have more confidence and more physical space to make slower, more thoughtful decisions about sentimental belongings.
Save Sentimental Items for After Easy Wins
You do not need to keep every object connected to a memory. Choose the items that matter most and set a physical limit, such as one memory box, one shelf, or one storage bin per person. You can photograph items before donating or recycling them if the memory matters more than the object itself. For family photos, sort duplicates first. Keep the best version, remove damaged duplicates, and consider scanning important photos so they can be stored digitally as well.
Challenge “Just in Case” Clutter
“Just in case” items can fill closets, cabinets, garages, and storage bins. Some are worth keeping, but many are held because of guilt, fear of waste, or the idea that they may be useful someday.
Before keeping an item, ask:
- Have I used this in the past year?
- Would I buy this again today?
- Do I already own something similar?
- Is this easy to replace if I need it later?
- Does this support my current life?
- Am I keeping it because I use it, or because I feel guilty?
Step 5: Remove Unwanted Items From the Home Quickly
Decluttering is not finished when items are placed in donation bags or boxes. It is finished when those items leave the home. Donation bags that sit in the garage, hallway, trunk, basement, or closet for months are still taking up physical and mental space. Create a simple exit plan for every item you remove. Donate usable belongings, recycle approved materials, return borrowed items, and dispose of broken or unsafe items properly.
Create a Donation Station With a Real Exit Plan
A donation station can be a bag in a closet, a small bin near the laundry area, or a basket by the door. The system works only if the donations leave regularly.
Use this simple process:
- Keep one donation bag or bin in a consistent place.
- Add usable unwanted items as you find them.
- Schedule a drop-off, charity pickup, or donation day.
- Remove the bag as soon as it is full.
- Replace it with an empty bag right away.
Set a Deadline for Items You Plan to Sell
Selling can be helpful for valuable furniture, newer electronics, specialty tools, or high-quality clothing. But selling should not become a reason to keep unwanted items forever. Give yourself a firm listing deadline, such as seven or 14 days. If the item does not sell within your chosen period, reduce the price, donate it, or recycle it if appropriate. This keeps your decluttering project moving forward.
Step 6: Use Habits That Stop Clutter From Returning
Decluttering once is helpful, but a simple maintenance routine keeps the home from filling up again. The best systems are easy enough to follow during a busy week. Focus on a few habits that reduce incoming clutter and keep high-traffic areas under control.
Apply the One-In, One-Out Rule
The one-in, one-out rule means that when one new item enters a clutter-prone category, one similar item leaves. This works well for clothes, shoes, towels, mugs, toys, makeup, small appliances, throw pillows, and home décor. For example, if you buy a new pair of shoes, donate or recycle a pair you no longer wear. If a new mug comes into the kitchen, remove an old one. This helps keep the number of items within your storage space limits.
Keep One Surface Clear in Every Room
Choose one surface in each room that stays mostly clear. It might be one section of the kitchen counter, the dining table, a nightstand, a bathroom vanity, a coffee table, or a desk. This creates a quick visual reset and gives you an open area for daily cleaning. Clear surfaces also make a home feel more manageable. You can wipe the counter, dust the table, or clean the vanity in seconds instead of moving piles first.
Use a Weekly 15-Minute Home Reset
A short weekly reset prevents small piles from becoming larger projects. Choose one day or divide the work across the week.
| Day | Short Decluttering Task |
| Monday | Sort mail, receipts, and paper clutter |
| Tuesday | Clear kitchen counters and pantry items |
| Wednesday | Reset bathroom products and laundry areas |
| Thursday | Put away shoes, bags, coats, and entryway items |
| Friday | Clear the living room or dining table |
| Weekend | Fill one donation bag, recycle items, or reset one shelf |
Step 7: Declutter Before a Deep Clean, Regular Cleaning Visit, or Move
Decluttering does not replace cleaning. It prepares the home to make cleaning more effective. Once counters, floors, cabinets, shelves, and bathroom surfaces are clear, you or a cleaning team can focus on the dirt, dust, grime, appliance buildup, floor edges, baseboards, and other details that need attention.
Before a Professional Deep Cleaning Appointment
Before a deep cleaning visit, pick up loose clothing, toys, paperwork, and personal belongings from floors and surfaces. Clear kitchen and bathroom counters, put away valuables, empty sinks if possible, and notify the cleaning team of any priority areas. This preparation helps cleaners spend more time on actual cleaning instead of moving items or working around clutter. RMS Cleaning offers deep cleaning and one-time cleaning services for New Jersey homes that need detailed work in kitchens, bathrooms, floors, and other high-use areas.
Before Moving Out of an Apartment or House
Decluttering before moving can reduce the number of items you need to pack, carry, store, donate, or transport. It also makes move-out cleaning easier because closets, cabinets, shelves, floors, and storage areas are already clear. This is a good time to sort unused clothes, duplicate kitchen supplies, old furniture, expired food, forgotten storage items, and unnecessary paperwork. After the property is empty, a move-out cleaning service can focus on kitchen appliances, bathrooms, cabinets, floors, and final inspection details.
FAQs About Decluttering Tips From Professionals
What is the fastest way to start decluttering?
Start with one small low-emotion space, such as a junk drawer, bathroom cabinet, kitchen shelf, or entryway surface. Set a 10- or 15-minute timer and remove obvious trash, duplicates, expired products, and items you no longer use.
Should I declutter or organize first?
Declutter first. Remove items you no longer need before buying baskets, bins, labels, or other storage products. Organizing works better after you have reduced the amount of stuff that needs a home.
How do I declutter when I feel overwhelmed?
Choose one area that affects your daily routine, work in a short timed session, and avoid sentimental items at the beginning. A clean drawer, shelf, or counter gives you a visible win and makes the next step easier.
What is the 50% decluttering rule?
The 50% rule is a simple approach for overfilled categories. It suggests reducing a category by about half, especially where there are duplicates, unused décor, old clothing, extra kitchen items, or too many household supplies. Use it as a guide rather than a strict requirement.
How do I declutter sentimental items?
Handle sentimental items after easier areas are finished. Set a physical limit, keep the most meaningful pieces, photograph some items, and let go of duplicates or items that no longer fit your home and current life.